- Products
-
Design Templates
- Featured Design Galleries
- More Galleries
- Services & Resources
- Free Sample Kit
- Deals


Proper image resolution is critical to printing a professional piece that features crisp graphics, sharp definition and beautiful color depth. It’s important to check your image resolution before you print to ensure your project looks as amazing on paper as it does on your computer screen.
Our guide to image resolution includes:
Whether you’re printing marketing tools such as business cards, brochures, and postcards or keepsakes such as family photos, refrigerator magnets, or greeting cards, you can print picture-perfect artwork with these tips for proper image resolution.
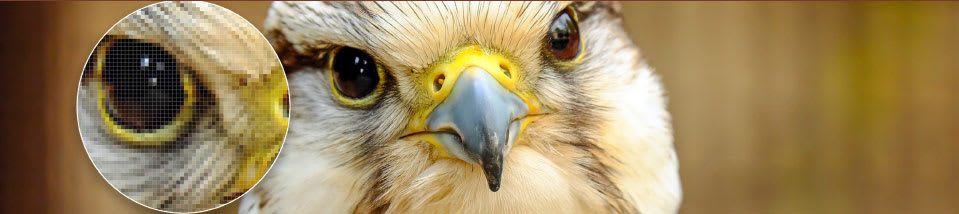
Image resolution can be defined as the level of detail in an image. Raster images are comprised of a series of pixels, where resolution is the total number of pixels along an image’s width and height, expressed as pixels per inch (PPI).
The greater the PPI, the greater the detail and the better the print quality – whether you’re printing invitation cards for an upcoming event or a family photo to frame on your wall.
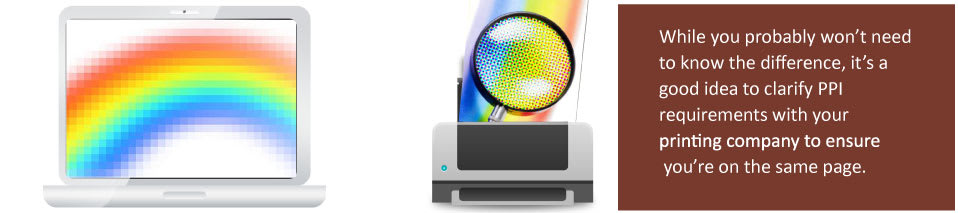
Often, PPI and dots per inch (DPI) are used interchangeably; however, PPI and DPI are not identical. Though they are similar, PPI refers to the pixels per inch on your computer screen, while DPI refers to the ink dots per inch applied by a printing press.
If your printing company requires artwork in a certain DPI, chances are they’re really referring to PPI. Again, the easiest way to think about it is:
You don’t need to worry about resolution when you design your own brochures, postcards, business cards, greeting cards, stickers, and more with our free design templates and online design tool!
NOTE: Resolution applies to raster images, which are comprised of pixels, but not vector images, which use mathematical calculations to produce images. Learn more about the difference between raster and vector images.
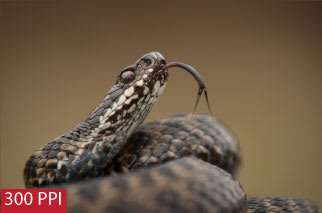
What resolution should photos be for printing? What should DPI (or PPI) be for printing high-quality artwork? In many cases, the best resolution for printing is 300 PPI.
At 300 pixels per inch (which roughly translates to 300 DPI, or dots per inch, on a printing press), an image will appear sharp and crisp. These are considered to be high resolution, or high-res, images. (If you’re working with photography, you’re probably working with high-resolution JPEGs, which can be printed as stand-alone photos or incorporated into your brochure printing and other projects).
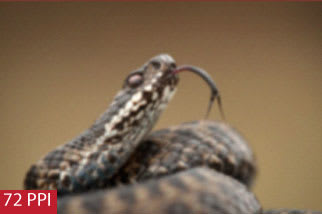
What about the best resolution for pictures online? Web images are commonly created in 72 or 96 PPI, which are considered to be low resolutions. They’re perfect for the web because they feature smaller file sizes that can load quickly online, but they do not translate well to print.
Low resolution, or low-res, images will appear pixelated and blurred after printing – even though they might look perfect on your computer screen. That’s because there aren’t enough pixels per inch to maintain a sharp image at large document dimensions.
It’s important to understand the relationship between document dimension and resolution.
For example, a 4” x 6” image at 72 pixels per inch would have a total pixel dimension of 288px (height) by 432px (width). That means there would only be 288 pixels spread out over four inches. To make that stretch, each of those 288 pixels would need to be rather large, resulting in a blurry, pixelated image.
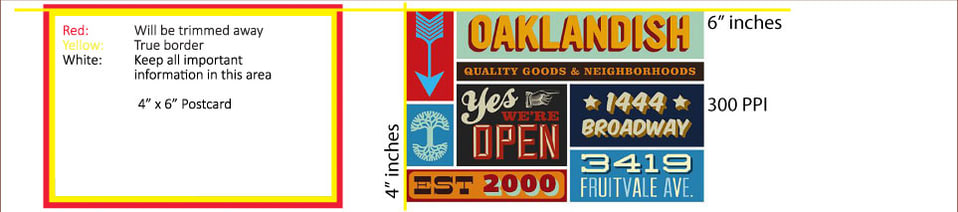
A 4” x 6” image at 300 pixels per inch (a common size for postcard printing), on the other hand, would have a total pixel dimension of 1,200px (height) by 1,800px (width). Compared to the 72 PPI version, the four-inch span would be represented by 1,200 pixels instead of 288 pixels – or 912 more pixels. That means the pixels can be smaller, resulting in higher definition and clear, sharp image.

The best resolution for a given project depends on multiple factors, including the type of project you’re printing and the type of printer you’re using. For example, if you want to print high-quality business flyers on an offset or digital printing press, your flyers should be 300 PPI. If you want to print 8” x 10” photos on your inkjet printer, a resolution of 220 PPI might be enough to produce acceptable results.
| Project | Printer | Resolution |
|---|---|---|
| Marketing tools (brochures, business cards, flyers, posters, etc.) | Offset or digital printing press | 300 PPI |
| Photos (4 x 6, 5 x 7, 8 x 10) | Offset or digital printing press | 300 PPI |
| Photos (4 x 6, 5 x 7, 8 x 10) | Desktop inkjet printer | 220 PPI |
| Print on demand garments and accessories (T-shirts, mugs, hats, etc.) | Large format inkjet printer | 150 to 300 PPI |
| Screen printed garments (hats, shirts, etc.) | Screen printer | 150 to 300 PPI |
Those are examples; every printing company has its own resolution requirements. The best pixel size for print can vary between printing companies, printing formats and printing presses. It’s best to check with your printing company before you create your artwork so you can format it in the proper resolution.
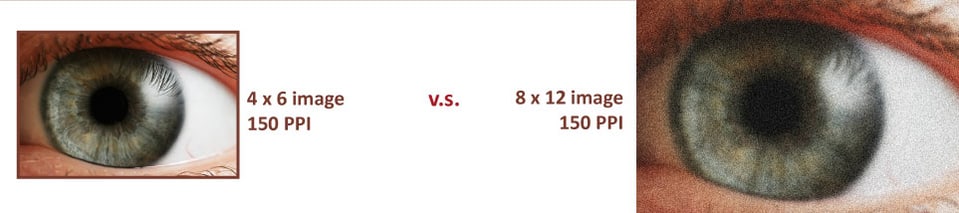
The size of your final printed project can determine whether you can print in a lower resolution; for example, a 150 PPI image might look fine at 4” x 6” but look blurry at 8” x 12”. Often, it’s best to err on the side of caution and create your artwork in 300 PPI, since you can downsize if needed without sacrificing quality.
You might wonder how resolution relates to cameras, especially if you’re taking pictures with an iPhone or other smartphone. The higher the resolution of your camera, the larger you can print images and still get a clear output.
How many pixels are in 300 PPI depends on the document dimensions. Let’s say, for example, you want to print an 8” x 10” photo at 300 PPI (the best resolution for a photo, in most cases).
You can multiply both 8 and 10 by 300 to get the full pixel dimensions of the finished image.
You can multiply both 8 and 10 by 300 to get the full pixel dimensions of the finished image.
Another name for 7.2 million pixels is 7.2 megapixels (MP); which means you’ll need a minimum 7.2 MP camera to get the best resolution for your 8” x 10” photo.
Fortunately, the latest-model iPhones feature camera resolutions up to 12 MP; and DSLR cameras often feature 18 MP and up, so you don’t need to be a professional photographer to start with a high-resolution image.
You can use this knowledge to figure out other questions, such as “how big is 1920 x 1080 in inches?” All you need to know how to convert pixels to inches.
If you know the PPI – again, let’s say 300 – you divide the total dimensional pixels to determine the inches:
So, a 1920x1080 image in 300 PPI would be 6.4” x 3.6”
For another example, we might want to figure out how many pixels are in a 5 x 7 image. Again, we need to know the PPI.
If it’s 300 PPI, you would multiply that figure by 5 and 7, respectively:
So a 5 x 7 image at 300 PPI would be 1,500px by 2,100px.
Now, you can figure out the total megapixels by multiplying width times height:
In this case, you can print a high-quality 5 x 7 photo by snapping a picture with a 3.2 MP (or greater) camera.
Take the guesswork out of file preparation with free layout templates for brochures, postcards, business cards, greeting cards, stickers and more!
How do you find the resolution of an image? How can you tell if an image is high resolution? Here are five easy ways to determine the resolution of any image. Use them to check files for proper resolution before printing.
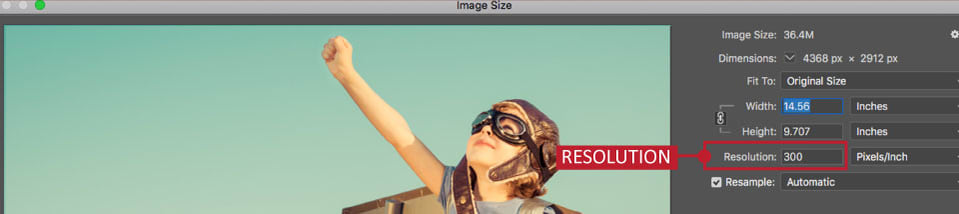
If the resolution is already set at 300 PPI, your artwork is print-ready.
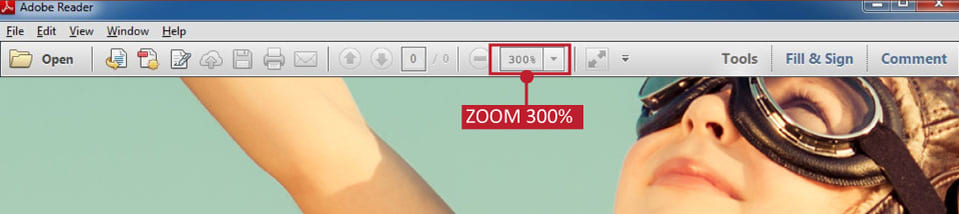
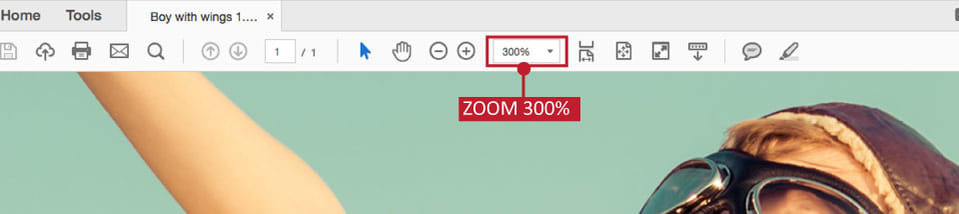
If your artwork appears pixelated, it’s low resolution. If it appears crisp at 300 percent, then your artwork is print-ready.
Your image resolution will display in the details tab.
Your image resolution will display in the More Info tab.
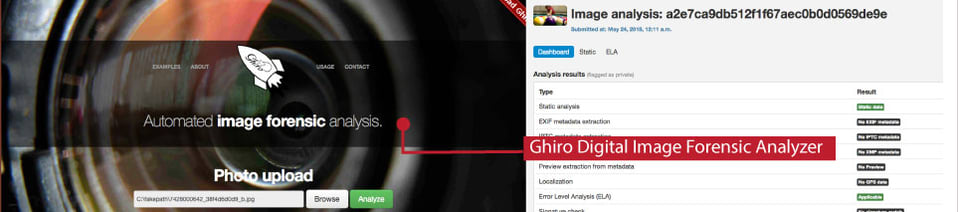
Search online for a photo quality checking tool. One example is the Ghiro Digital Image Forensic Analyzer. You can upload your photo and select the EXIF tab to see your photo resolution. It’s an easy way to check the resolution of a JPEG image before you begin editing.
The best way to fix image resolution issues is to start with a high-res image that’s at least 300 PPI; however, that’s not always possible. Finding your image resolution is simple, and if it’s already set in the proper resolution you’re good to go.
But what if your resolution is too low for high-quality printing? How do you make a low-resolution photo high resolution? Do you need to change the size of a JPEG, or make a high resolution JPEG?
Resolution isn’t the only thing that dictates quality. Bring your artwork to life with vivid soy-based inks and state-of-the-art digital and offset printing services at discount prices.
If the original image has large document dimensions (actual printed size) yet low resolution, you can increase the resolution without sacrificing much quality – however, your document dimensions will decrease significantly.
Let’s say you have a JPEG file that has a document size of 8” x 10” but a resolution of 72 PPI. How do you make a JPEG higher resolution or make a picture 300 DPI? You can use Photoshop to change the resolution to 300 PPI.
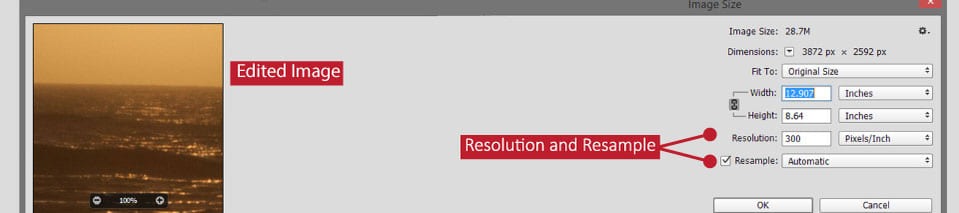
Your image will now be set to 300 PPI without significant loss of quality; however, it will have changed dimensional size – in this case, from 8” x 10” to 1.92” x 2.4”. That’s pretty small, but if you’re designing a brochure it might be large enough, dimensionally, for an image set in the text.


If you want to increase image resolution yet maintain document dimensions, you would follow the same process as above – except this time, you’ll make sure the “resample” box is checked:

In this case, Photoshop will attempt to add new pixels between existing pixels to increase the resolution and maintain dimensional size. It does this by analyzing individual pixels and automatically calculating what should go between them. For example, if a blue pixel is next to a red pixel, it might add a purple pixel between them.
You can play around with each of these options to see which produces the best results for your image. However, resampling often leads to undesirable effects such as poor image quality. Many experts recommend resampling by only 5 to 10 percent to minimize image distortion.
You can try to regain lost detail with Photoshop’s Unsharp Mask filter, though results might be mixed.
Unfortunately, resampling in this manner often leads to undesirable effects. Many experts recommend resampling by only 5 to 10 percent to minimize image distortion. Learn more about print layout guidelines for Photoshop.
If you’re unable to achieve a high-quality, high-resolution photo on your own, professional photo enlargers can help. Instead of using automated processes, they use software to manually manipulate your photos to increase resolution and even document dimension, if required.
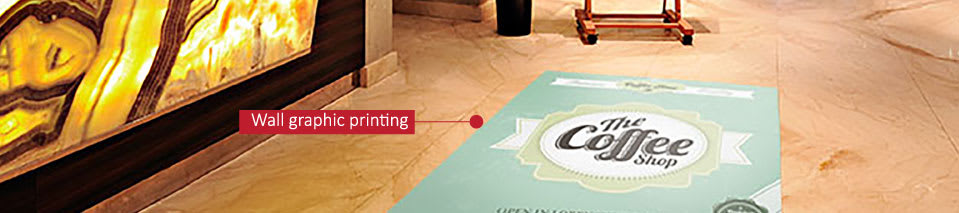
Even if you’re pretty savvy in Photoshop, you might want to consult a professional photo enlarging service if you’re printing large-format graphics; for example, wall graphic printing.
You can also consider using an online picture resizer to change the size of images. These tools can be used to check image quality online.
Examples include:
Results might be mixed, depending on the original resolution of your image and your desired output. If your original image is too small, no image resolution converter can maintain quality when you increase resolution.

Again, the best option is to start with an image that’s already as large – or larger – than you need it, both by document dimension and resolution. If that’s not possible, you can try the options listed here to increase your image resolution without losing quality. Learn more with this free print quality checklist.
Once your image is sized and in the proper resolution, you can add it to your artwork and send it to print, confident it will look as incredible on paper as it does on your computer screen. Bring your artwork to life with premium printing services at discount prices today!
Resources pages linked to:


